MAX7219 LED Dot Matrix Display
Introduction
The MAX7219 is one of the most popular drivers for 8x8 LED matrix modules. It makes dot matrix displays much easier to use because it handles the multiplexing for you. Instead of manually driving rows and columns yourself, you send data over SPI and let the MAX7219 take care of the display updates.
With Raspberry Pi Pico and MicroPython, this makes it easy to build:
- scrolling text displays — rolling messages across your matrix
- custom sprite animations — draw visually using the built-in sprite designer
- scoreboards and counters — real-time numeric displays
- status indicators — visual feedback from your projects
- chained displays — combine multiple matrices for larger visuals
This tutorial includes a visual sprite & animation designer that lets you draw directly on the LED matrix and instantly generates complete, ready-to-run MicroPython code — no manual hex encoding required.
You'll work with three useful display configurations:
- a single
8x8module (classic 8×8 grid) - a chained
4 x 8x8display (32-pixel-wide banner) - a larger
8 x 8x8display (64-pixel-wide scrolling canvas)
Why Use This Module?
Advantages:
- Simple SPI wiring — just 3 data lines plus power
- Works well with MicroPython — clean, readable code
- Easy to chain multiple modules — scale your display without complexity
- Visual design tool included — no need to calculate hex values by hand
- Low power consumption — suitable for battery-powered projects
- Built-in brightness control — adjustable PWM brightness
Components Needed
| Component | Quantity |
|---|---|
| Raspberry Pi Pico or Pico W | 1 |
| MAX7219 8x8 LED matrix module | 1 or more |
| Jumper wires | Several |
| USB cable | 1 |
Wiring
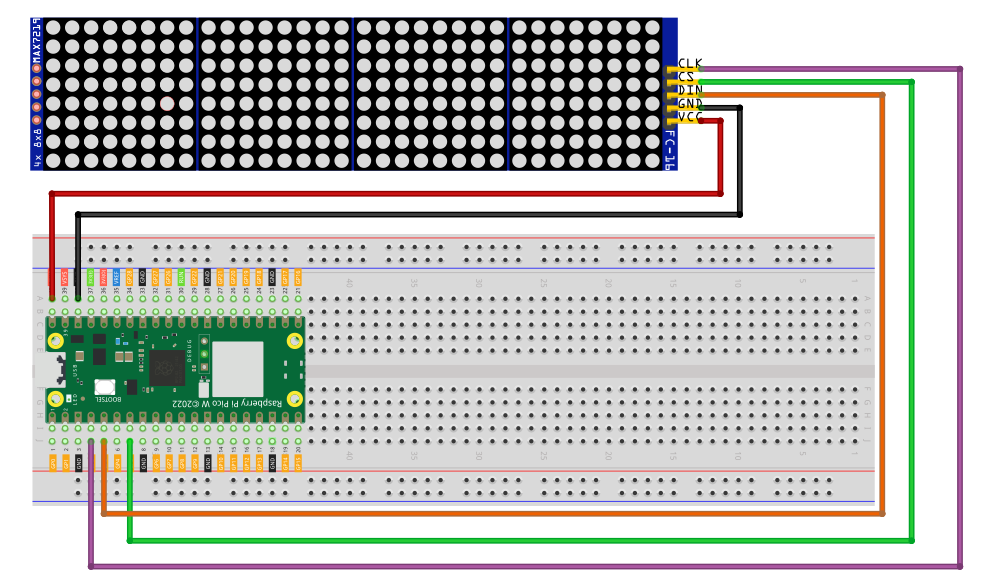
Common MAX7219 module pins:
VCCGNDDINCSorLOADCLK
Example Pico wiring:
VCC -> VBUS / 5VGND -> GNDDIN -> GP3CS -> GP5CLK -> GP2
Library
We will use this library based on - mcauser/micropython-max7219
from micropython import const
import framebuf
import time

_NOOP = const(0)
_DIGIT0 = const(1)
_DECODEMODE = const(9)
_INTENSITY = const(10)
_SCANLIMIT = const(11)
_SHUTDOWN = const(12)
_DISPLAYTEST = const(15)


class Matrix8x8:
    def __init__(self, spi, cs, num):
        self.spi = spi
        self.cs = cs
        self.cs.init(cs.OUT, True)
        self.buffer = bytearray(8 * num)
        self.num = num

        fb = framebuf.FrameBuffer(self.buffer, 8 * num, 8, framebuf.MONO_HLSB)
        self.framebuf = fb

        # expose framebuffer functions
        self.fill = fb.fill
        self.pixel = fb.pixel
        self.hline = fb.hline
        self.vline = fb.vline
        self.line = fb.line
        self.rect = fb.rect
        self.fill_rect = fb.fill_rect
        self.text = fb.text
        self.blit = fb.blit

        self.init()

    # -----------------------
    # LOW LEVEL
    # -----------------------
    def _write(self, command, data):
        self.cs(0)
        for _ in range(self.num):
            self.spi.write(bytearray([command, data]))
        self.cs(1)

    def init(self):
        for command, data in (
            (_SHUTDOWN, 0),
            (_DISPLAYTEST, 0),
            (_SCANLIMIT, 7),
            (_DECODEMODE, 0),
            (_SHUTDOWN, 1),
        ):
            self._write(command, data)

    def brightness(self, value):
        if not 0 <= value <= 15:
            raise ValueError("Brightness out of range")
        self._write(_INTENSITY, value)

    def show(self):
        for y in range(8):
            self.cs(0)
            for m in range(self.num):
                self.spi.write(bytearray([_DIGIT0 + y, self.buffer[(y * self.num) + m]]))
            self.cs(1)

    # -----------------------
    # ANIMATION TOOLKIT
    # -----------------------

    def scroll(self, message, speed=0.08, loop=False):
        width = self.num * 8
        while True:
            for pos in range(len(message) * 8 + width):
                self.fill(0)
                self.text(message, width - pos, 0, 1)
                self.show()
                time.sleep(speed)
            if not loop:
                break

    def scroll_reverse(self, message, speed=0.08):
        width = self.num * 8
        for pos in range(len(message) * 8 + width):
            self.fill(0)
            self.text(message, -width + pos, 0, 1)
            self.show()
            time.sleep(speed)

    def blink(self, message, times=5, speed=0.3):
        for _ in range(times):
            self.fill(0)
            self.show()
            time.sleep(speed)

            self.fill(0)
            self.text(message, 0, 0, 1)
            self.show()
            time.sleep(speed)

    def fade_in(self, message):
        for b in range(16):
            self.brightness(b)
            self.fill(0)
            self.text(message, 0, 0, 1)
            self.show()
            time.sleep(0.05)

    def fade_out(self, message):
        for b in range(15, -1, -1):
            self.brightness(b)
            self.fill(0)
            self.text(message, 0, 0, 1)
            self.show()
            time.sleep(0.05)

    def bounce(self, message, speed=0.05):
        width = self.num * 8
        text_width = len(message) * 8

        for pos in range(width - text_width):
            self.fill(0)
            self.text(message, pos, 0, 1)
            self.show()
            time.sleep(speed)

        for pos in range(width - text_width, 0, -1):
            self.fill(0)
            self.text(message, pos, 0, 1)
            self.show()
            time.sleep(speed)

    def wipe(self, speed=0.02):
        width = self.num * 8
        for x in range(width):
            self.vline(x, 0, 8, 1)
            self.show()
            time.sleep(speed)

        for x in range(width):
            self.vline(x, 0, 8, 0)
            self.show()
            time.sleep(speed)

    def draw_sprite(self, sprite, x_offset=0):
        for y in range(8):
            for x in range(8):
                if sprite[y] & (1 << (7 - x)):
                    px = x + x_offset
                    if 0 <= px < self.num * 8:
                        self.pixel(px, y, 1)
Save that file as max7219.py, then import it like this:
from max7219 import Matrix8x8
Basic Setup
from machine import Pin, SPI
from max7219 import Matrix8x8

def create_display(modules=1, din=3, cs_pin=5, clk=2):
    spi = SPI(
        0,
        baudrate=10000000,
        polarity=1,
        phase=0,
        sck=Pin(clk),
        mosi=Pin(din),
    )
    cs = Pin(cs_pin, Pin.OUT)
    return Matrix8x8(spi, cs, modules)

display = create_display(1)
If you chain multiple modules:
- single module ->
create_display(1) - 4 modules ->
create_display(4) - 8 modules ->
create_display(8)
If your wiring changes, you only need to edit the din, cs_pin, and clk values in one place.
Code Explanation
def create_display(modules=1, din=3, cs_pin=5, clk=2):
This helper function keeps the display setup in one place so the later examples stay short and easier to copy.
sck=Pin(clk), mosi=Pin(din)
These values define the CLK and DIN wiring for the MAX7219.
cs = Pin(cs_pin, Pin.OUT)
This sets the CS pin used by the display.
display = create_display(1)
The final 1 means one 8x8 matrix module is connected. If you chain four modules together, you would use create_display(4).
Example 1 - Single 8x8 Module
This is the simplest setup and a good first test to confirm your wiring and library are working.
from machine import Pin, SPI
from max7219 import Matrix8x8
import time

def create_display(modules=1, din=3, cs_pin=5, clk=2):
    spi = SPI(
        0,
        baudrate=10000000,
        polarity=1,
        phase=0,
        sck=Pin(clk),
        mosi=Pin(din),
    )
    cs = Pin(cs_pin, Pin.OUT)
    return Matrix8x8(spi, cs, modules)

display = create_display(1)
display.brightness(5)
display.fill(0)
display.text('A', 0, 0, 1)
display.show()
This clears the display, writes the character A, and sends it to the matrix.
Example 2 - Drawing Basics
This version shows one drawing function at a time so it is easier to understand what each one does.
from machine import Pin, SPI
from max7219 import Matrix8x8
import time

def create_display(modules=1, din=3, cs_pin=5, clk=2):
    spi = SPI(
        0,
        baudrate=10000000,
        polarity=1,
        phase=0,
        sck=Pin(clk),
        mosi=Pin(din),
    )
    cs = Pin(cs_pin, Pin.OUT)
    return Matrix8x8(spi, cs, modules)

display = create_display(1)

# Clear display
display.fill(0)
display.show()

# -----------------------
# Draw a horizontal line
# -----------------------
display.hline(0, 3, 8, 1)
display.show()
time.sleep(1)

# Clear
display.fill(0)
display.show()

# -----------------------
# Draw a vertical line
# -----------------------
display.vline(3, 0, 8, 1)
display.show()
time.sleep(1)

# Clear
display.fill(0)
display.show()

# -----------------------
# Draw a diagonal line
# -----------------------
display.line(0, 0, 7, 7, 1)
display.show()
time.sleep(1)

# Clear
display.fill(0)
display.show()

# -----------------------
# Draw a rectangle
# -----------------------
display.rect(1, 1, 6, 6, 1)
display.show()
time.sleep(1)

# Clear
display.fill(0)
display.show()

# -----------------------
# Draw pixels (corners)
# -----------------------
display.pixel(0, 0, 1)
display.pixel(7, 0, 1)
display.pixel(0, 7, 1)
display.pixel(7, 7, 1)
display.show()
Drawing Function Arguments
pixel(x, y, color)
display.pixel(0, 0, 1)
x-> horizontal position from0to7y-> vertical position from0to7color->1= on,0= off
hline(x, y, length, color)
display.hline(0, 3, 8, 1)
x,y-> starting pointlength-> how long the line iscolor->1or0
This draws a horizontal line.
vline(x, y, length, color)
display.vline(3, 0, 8, 1)
This draws a vertical line.
line(x1, y1, x2, y2, color)
display.line(0, 0, 7, 7, 1)
(x1, y1)-> start point(x2, y2)-> end point
This lets you draw a line in any direction.
rect(x, y, width, height, color)
display.rect(1, 1, 6, 6, 1)
x,y-> top-left cornerwidth,height-> size
This draws an outline rectangle.
fill(0 or 1)
display.fill(0)
0-> clear the screen1-> fill the whole screen
Example 3 - 4 x 8x8 Chain
If you connect four modules together, you get a 32x8 display. That is much better for short words, counters, and mini banners.
from machine import Pin, SPI
from max7219 import Matrix8x8

def create_display(modules=1, din=3, cs_pin=5, clk=2):
    spi = SPI(
        0,
        baudrate=10000000,
        polarity=1,
        phase=0,
        sck=Pin(clk),
        mosi=Pin(din),
    )
    cs = Pin(cs_pin, Pin.OUT)
    return Matrix8x8(spi, cs, modules)

display = create_display(4)
display.brightness(5)
display.fill(0)
display.text('PICO', 0, 0, 1)
display.show()
Example 4 - 4 x 8x8 Short Scroll
This is a good example if you want one moving message across four chained modules.
from machine import Pin, SPI
from max7219 import Matrix8x8

def create_display(modules=1, din=3, cs_pin=5, clk=2):
    spi = SPI(
        0,
        baudrate=10000000,
        polarity=1,
        phase=0,
        sck=Pin(clk),
        mosi=Pin(din),
    )
    cs = Pin(cs_pin, Pin.OUT)
    return Matrix8x8(spi, cs, modules)

display = create_display(4)
display.scroll(" PICO ", 0.08, loop=True)
Example 5 - 8 x 8x8 Long Scrolling Text
With eight modules chained together, you get a 64x8 display, which is much better for long text. This is probably the best showcase example for the tutorial.
from machine import Pin, SPI
from max7219 import Matrix8x8

def create_display(modules=1, din=3, cs_pin=5, clk=2):
    spi = SPI(
        0,
        baudrate=10000000,
        polarity=1,
        phase=0,
        sck=Pin(clk),
        mosi=Pin(din),
    )
    cs = Pin(cs_pin, Pin.OUT)
    return Matrix8x8(spi, cs, modules)

display = create_display(8)
display.brightness(4)
display.scroll(" NERDCAVE - RASPBERRY PI PICO - MICROPYTHON ", 0.05, loop=True)
Example 6 - Static Text Across 8 Modules
If you do not want scrolling yet, you can still use eight modules like one wide banner.
from machine import Pin, SPI
from max7219 import Matrix8x8

def create_display(modules=1, din=3, cs_pin=5, clk=2):
    spi = SPI(
        0,
        baudrate=10000000,
        polarity=1,
        phase=0,
        sck=Pin(clk),
        mosi=Pin(din),
    )
    cs = Pin(cs_pin, Pin.OUT)
    return Matrix8x8(spi, cs, modules)

display = create_display(8)
display.brightness(5)
display.fill(0)
display.text('MAX7219', 0, 0, 1)
display.show()
Brightness Control
You can change the display brightness:
display.brightness(1)
or
display.brightness(10)
Lower values are often easier to read indoors and use less power.
Built-In Animation Helpers
If you use the updated library above, you also get a small animation toolkit built into Matrix8x8.
1. Scroll Text
Scroll text smoothly from right to left across the display.
display.scroll("HELLO", 0.05)
Arguments:
message-> text to displayspeed-> delay between frames, where smaller values scroll faster
Good for messages, names, or notifications.
2. Reverse Scroll
Scroll text from left to right.
display.scroll_reverse("WORLD", 0.05)
This is useful when you want a different motion direction or want to alternate animations.
3. Blink Text
Make text flash on and off.
display.blink("HI", times=6, speed=0.2)
Arguments:
times-> number of blinksspeed-> on/off delay
This works well for alerts or attention-grabbing messages.
4. Fade In / Fade Out
Use MAX7219 brightness control for a smoother effect.
display.fade_in("A")
display.fade_out("A")
This is a simple way to add visual polish without changing the wiring or setup.
5. Bounce Text
Move short text across the display and back again.
display.bounce("OK", 0.05)
This works best with short words or status indicators.
6. Wipe Effect
Fill and clear the screen column by column.
display.wipe()
This makes a good transition between other animations.
Sprite & Animation Designer
Instead of hand-coding LED matrix patterns in hexadecimal, use the interactive Sprite & Animation Designer to draw visually and get complete, runnable code instantly.
What you can do
- Draw sprites pixel-by-pixel on an 8×N grid (supports 1–16 panels)
- Create frame-by-frame animations with live preview
- Match your hardware setup — configure panel count, pin assignments, and brightness once, and they're baked into the generated code
- Copy-paste ready code — no manual hex encoding, no setup boilerplate
How the tool works
Single sprite (static image):
Draw one frame. The tool generates code that writes the pattern straight into display.buffer:
frame = bytearray([
    0xFF,  # ########
    0x81,  # #      #
    0x81,  # #      #
    0xFF,  # ########
    # ... more rows
])
display.buffer[:] = frame
display.show()
Multi-frame animation:
Add a second frame, and the tool automatically switches to animation mode. It generates a frames list and a play loop that cycles through them:
frames = [
    bytearray([...]),  # frame 1
    bytearray([...]),  # frame 2
]
while True:
    for f in frames:
        display.buffer[:] = f
        display.show()
        time.sleep(0.2)
Tips for best results
- Live preview shows your animation in real time, independently of which frame you're editing — check timing without losing your place.
- Duplicate frame is the fastest way to build animations: copy the last frame, nudge a few pixels, repeat.
- Panel lines in the grid show where each module boundary falls, so you know how your design maps to hardware.
- Adjust delay during editing — frame delay is in milliseconds in the UI but converts to seconds in the generated code.
- Deleting frames simplifies code — go from animation mode back to a static image by deleting extra frames, and the output automatically reverts to the simpler
bufferassignment.
Try it now
from machine import Pin, SPI
from max7219 import Matrix8x8

def create_display(modules=1, din=3, cs_pin=5, clk=2):
    spi = SPI(
        0,
        baudrate=10000000,
        polarity=1,
        phase=0,
        sck=Pin(clk),
        mosi=Pin(din),
    )
    cs = Pin(cs_pin, Pin.OUT)
    return Matrix8x8(spi, cs, modules)

display = create_display(modules=8, din=3, cs_pin=5, clk=2)
display.brightness(4)

# 64x8 image across 8 panels
frame = bytearray([
    0x00, 0x00, 0x00, 0x00, 0x00, 0x00, 0x00, 0x00,  # ................................................................
    0x00, 0x00, 0x00, 0x00, 0x00, 0x00, 0x00, 0x00,  # ................................................................
    0x00, 0x00, 0x00, 0x00, 0x00, 0x00, 0x00, 0x00,  # ................................................................
    0x00, 0x00, 0x00, 0x00, 0x00, 0x00, 0x00, 0x00,  # ................................................................
    0x00, 0x00, 0x00, 0x00, 0x00, 0x00, 0x00, 0x00,  # ................................................................
    0x00, 0x00, 0x00, 0x00, 0x00, 0x00, 0x00, 0x00,  # ................................................................
    0x00, 0x00, 0x00, 0x00, 0x00, 0x00, 0x00, 0x00,  # ................................................................
    0x00, 0x00, 0x00, 0x00, 0x00, 0x00, 0x00, 0x00,  # ................................................................
])

display.buffer[:] = frame
display.show()
Common Problems
Nothing lights up
- check that the module is powered correctly
- confirm
DIN,CLK, andCSare connected to the expected Pico pins - verify SPI pin assignments in the code
Display is mirrored or text seems backwards
Some MAX7219 modules are chained in different physical directions. You may need to adjust your text position or use a different module orientation.
Random flickering
- lower the SPI speed if needed
- check jumper wires
- make sure the power supply is stable
Summary
The MAX7219 dot matrix display is one of the easiest ways to add visual output to a Raspberry Pi Pico project. With MicroPython, a ready-made driver, and the built-in sprite designer, you can:
- quickly display characters and scrolling text — use the library's animation helpers or write your own
- draw custom sprites and animations visually — no hex encoding required, the tool generates code for you
- chain multiple modules — scale from a single 8×8 grid to 64-pixel-wide displays
- adjust brightness and timing — responsive to your power budget and project needs
Key takeaways:
- SPI communication is simple and reliable
- The
Matrix8x8driver handles multiplexing and display logic - Always call
show()after drawing to update the display - Start with 1 module, chain more as your project grows
- Use the sprite designer for custom animations without manual work